I can remember exactly what made me want to learn to crochet. I was watching an episode of Rosanne on TV and saw the granny square afghan on the couch. I had to have one for myself, and I definitely am not the only one who did. Just do a quick Google search on “Roseanne couch afghan” if you have any doubts. The blanket probably should have won an Emmy.
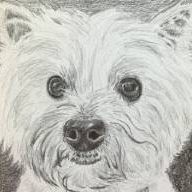
My first attempt at making my own version was good practice in crocheting, but my color scheme was too regimented, and it wasn’t nearly as fun as Roseanne’s. Fast forward many years later and my daughter got me hooked on the TV show Lucifer. In one of the episodes, the Detective, played by Lauren German, goes to the beach wearing an amazing granny square cover-up. She looked so cool wearing it, and I searched frantically for a pattern to make one for myself. I couldn’t find exactly what I wanted so I MacGyvered one on my own. At some point in the process, I realized that my middle-aged self wasn’t actually cool enough to wear the sweater. That, and my natural style is a bit more shirt collar-y and conservative. I have always wanted to be hip and boho, but I am just too uptight to pull anything like that off authentically.
My beautiful artsy daughter, on the other hand, was perfect for it. She is an art teacher, and when she wore it to school for the first time, her kids told her that it was just like the afghan from Roseanne’s couch. My crocheting had come full circle.
If you are like me and leap into projects with excitement, I’ll give you just two warnings. Making the granny squares is easy. Assembling the sweater and finishing the border made me sweat. I’ll do my best to explain how I assembled and finished mine, but read the instructions and look at the diagrams before you start to make sure that it fits with your skill level and are comfortable with some gaps in my instructions.
My second warning would be to carefully pay attention to the sizing notes before you rush off to fill your shopping cart with yarn. I have only made one size and have provided lots of measurements for you to compare with one of your best fitting sweaters to see if The Favorite Art Teacher Sweater will work for you. I also provide recommendations for sizing adjustments, but crocheter beware, I haven’t made them myself and can’t guarantee the fit. Your best bet if you are looking for a professionally developed pattern is this Coatigan in Grannies pattern from Yarnspirations.
Instructions
Lion Brand 24/7 Cotton Yarn in Black (11 skeins), Red, Tangerine, Lemon, Goldenrod, Grass, Mint, Aqua, Sky, Denim, Navy, Purple, Rose, Pink, White, Ecru, and Silver
4.0mm G Crochet Hook
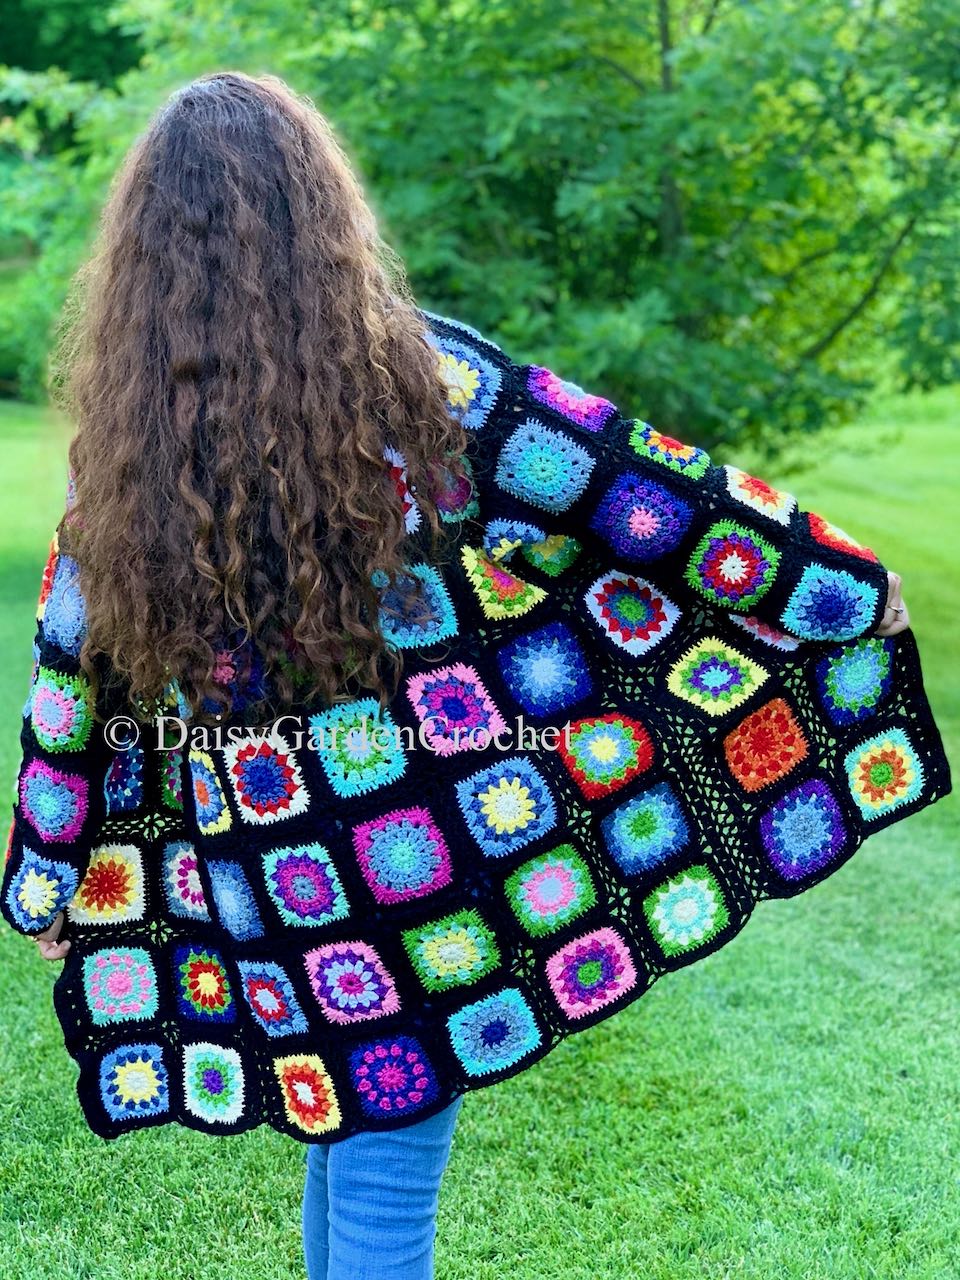
There was no rhyme or reason to the color combinations that I used in making my granny squares. I just used colors that I thought looked good together. Here are some close-up photos of the sweater if you need ideas for your squares.


Sizing
Both my daughter and I wear a medium in most tops, but this sweater fits her well and is a bit too big for me. My daughter is about 5′ 6″ tall with a curvy figure, and the 7 granny square length of the sweater (35.75″) is perfect for her. I am 5′ 5″ tall and straight through the hips, so a 6 square length would be a better fit for me. If you are tall and think that you might need an 8 square length, please keep in mind that the finished sweater will feel fairly heavy once complete. I highly recommend that you measure the length of one of your best fitting cardigans to determine the ideal length for you. Also, if adding or removing a full 4.5″ square is too much, you could always add a custom width border to the bottom of the sweater in black.
The 18.5″ sleeves are 4 granny squares long. For me, that length is about a half a square too long. If you are like me, I would recommend making the sleeves 3 squares long and adding extra length by crocheting a cuff in black.
To size the sweater down to a small, I would recommend making the back of the sweater only 4 granny squares across instead of 5. I am not sure what the best approach would be to size the sweater up to a large. One suggestion would be to crochet a sample granny square with a larger hook. If you could bump the sides of the square up to 5″ x 5″, then that would add about 4.5″ to the circumference of the sweater. Changing the size of the granny square will affect the length as well, which may or may not work for you.
Last, but not least, in using the granny triangles to create a sweetheart neckline, I ended up with a fairly large opening of 9.5″ at the neck. I used a black border to build up the neckline, but in hindsight, I should have built up the 1.5″ border over the shoulders (highlighted with blue lines in the photo below) even more to prevent it from wanting to slip off. With the button, it’s not a problem for my daughter, but it is too big of an opening for me (my shoulders measure about 15″ across).


How to Make the Granny Squares
Make 85 squares and 2 triangles with each square measuring 4.5″ x 4.5″
Work all granny squares with the right side facing you.
To begin each square, chain (ch) 5 in color 1 and join with a slip stitch in the first ch to form a ring.
Round 1: Color 1
Ch 4 (counts as 1 triple crochet), work 11 triple crochets (tc) in the ring and join with an invisible join in the top of the beginning ch 4. Fasten off for 12 tc total.
Round 2: Color 2
Draw up a loop of of color 2 in any space between the stitches, ch 3 and double crochet (dc) in the same space, *ch 1, 2 dc in the next space between stitches, and repeat from * all the way around until you come to the beginning ch 3. Ch 1 and invisible join to the top of the beginning ch 3 for a total of 24 dc in 12 ch 1 spaces.
Round 3: Color 3
Draw up a loop of color 3 in any ch 1 space. Ch 3, 2 dc in same ch 1 space. *Ch 1, 3 dc in next ch 1 space and repeat from * all the way around until you come to the beginning ch 3. Ch 1 and invisible join to the top of the beginning chain ch 3 for a total of 36 dc and 12 ch 1 spaces.
Round 4: Color 4
Draw up a loop of color 4 in any ch 1 space. Ch 3, 2 dc in the same ch 1 space. Ch 1. *4 dc, ch 2, 4 dc, ch 1* to make the first corner. 3 dc, ch 1 two times. Repeat * to make corner #2. 3 dc, ch 1 two times. Repeat * to make corner #3. 3 dc, ch 1 two times. Repeat * to make corner #4. 3 dc, ch 1 and join to the top of the beginning ch 3 with an invisible join. Each corner will have 2 sets of 4 dc separated by a ch 2 space, and each side will have 2 sets of 3 dc with ch 1 spaces.
Round 5: Black
Draw up black yarn in any dc. Ch 3. DC in the top of each dc stitch skipping each ch 1 space. 3 dc in each ch 2 corner. Join with an invisible join to the top of the beginning ch 3.

How to Make the Granny Triangles
Work the granny triangle with the right side facing you.
To begin each triangle, ch 5 in Color 1 and join with a slip stitch in the first ch to form a ring.
Round 1: Color 1
Ch 4 (counts as first TC), work 6 tc in the ring and join with an invisible join in the top of the beginning ch 4. Fasten off for 7 tc total.
Round 2: Color 2
Draw up a loop of of your second color in the first space, ch 3, dc, and ch 1 in the same space. 2 dc, ch1 in the second space. 2 dc, ch 2 in the third space. 2 dc, ch1 in the next 2 spaces. 2 dc in the last space and fasten off for a total of 12 dc and 5 gaps.
Round 3: Color 3
Draw up a loop of color 3 in the top of the first dc. Ch 3, ch 1. 3 dc, ch 1 in next 2 spaces. 3 dc, ch 2, 3 dc in next space to form the 90 degree corner of the triangle, ch 1. 3 dc, ch1 in the next 2 spaces. DC in the top of the last stitch and fasten off.
Round 4: Color 4
Draw up a loop of color 4 in the top of the first dc and ch 3 (counts as first dc), 3 dc in the same space, ch1 for a total of 4 dc. 3 dc, ch1 in the next 2 spaces. 4 dc, ch 2, 4 dc, ch 1in the next space (90 degree corner). 3 dc, ch1 in the next 2 spaces. 3 dc in the next space with 1 dc in the top of the final stitch below for a total of 4 dc.
Round 4: Black
Draw up a loop of black yarn in the top of the corner dc, ch 3. Double crochet in each dc and skip each ch 1 space. 3 dc in each of the 3 corners. Place 19 dc along the diagonal. Join with an invisible join to the beginning ch.
Assembly
To assemble all of the granny squares, I used the flat braid join because I thought it added to the overall boho look. The only problem was that I had no idea how to actually join all of my squares that way. A search of the internet led me to Crochet365knittoo.com where the very talented Cheryl has a detailed post with excellent close-up photos to explain how she used a continuous braided join to assemble her Happily Ever After Afghan.
I used her method with the following adjustments. I chained 5 in the corners like she recommends, but for the sides, I chained 3, skipped 2 stitches and then single crocheted in the 3rd stitch. In joining the loops, I kept my yarn on the hook rather than removing it and re-inserting it as she does. The only time that I did remove the yarn from the hook was when I did the “four corner join” step in her instructions.
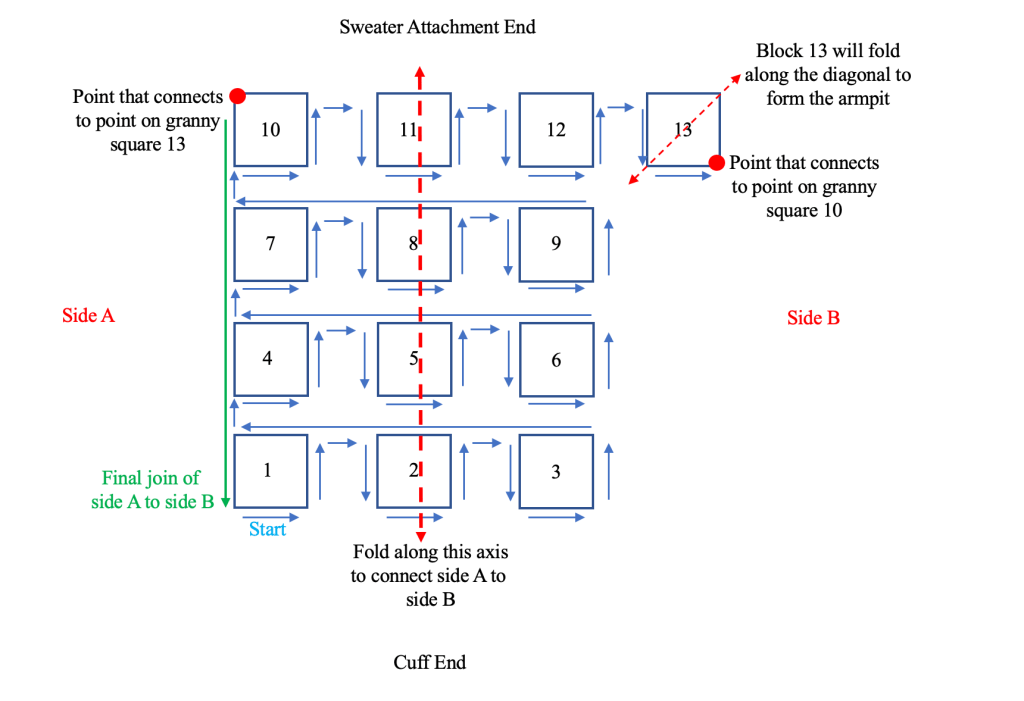
The assembly diagrams below provide detailed information describing the order that I joined my granny squares. Here is a list of the steps:
1. Join all of the squares in each of the front panels leaving the yarn balls attached and uncut at the stopping points.
2. Assemble the back panel and connect square 35 on the back to square 13 on the front right panel keeping the wrong sides facing each other.
3. Continue across the top of the back from squares 34 to 32 without joining.
4. Connect square 31 on the back to square 13 on the left front panel keeping the wrong sides facing each other.
5. Continue without joining to the front panel by going down the side of the back panel to the bottom edge of square 1.
6. To attach the left sleeve, using the uncut yarn from the top of the front left panel at the edge of square 13, proceed down the side of the left front panel until you reach the midpoint of square 9.
7. Connect the front left panel at the square 9 midpoint to the center of the sleeve’s armpit on the side that you want to face forward and attach by working up toward the shoulder.
8. At the shoulder, begin attaching the back side of the sleeve to the back panel of the sweater completing the sleeve attachment at the midpoint of square 21.
9. Continue joining the front left panel to the back panel with wrong sides facing until you reach the bottom of the sweater. Fasten off.
10. To attach the right sleeve, using the uncut yarn from the top of the front right panel at the edge of square 13, proceed down the side of the front right panel to the midpoint of square 9.
11. Connect the front right panel at the midpoint of square 9 to the center of the sleeve’s armpit on the side that you want to face forward and attach the front of the sleeve by working up to the shoulder.
12. At the shoulder, begin attaching the back side of the sleeve to the back panel of the sweater completing the sleeve attachment at the midpoint of square 25.
13. Continue joining the front right panel to the back panel with wrong sides facing until you reach the bottom of the sweater. Fasten off.


Adding the Border
1. To add the border, I started by adding 2 dc stitches in the bottom corner loop of square 2 on the front right panel and worked my way up toward the neckline by putting 3 dc stitches in each chain 3 loop with a ch 1 between each until I reached the spot where the granny triangle meets the shoulder square at which point I eliminated the ch 1.
2. On the first pass along the back of the neckline, I put 3 dc stitches in each chain 3 loop and 1 dc in each of the 2 loops connecting the squares.
3. At the bottom corner of the granny triangle on the front left panel, ch 2 and turn. Make a second pass double crocheting around the neckline. On the second pass, bypass the 3 dc in the corners where the front squares meet the back to tighten up the shoulders.
4. On this second pass on the back of the neckline, place 1 dc between the 2 dc below that had been placed in the 2 loops connecting the squares as described in step 2.
5. Continue to the bottom corner of the granny triangle on the right side of the front right panel, ch2, turn, and make a third pass around the neckline without double crocheting in the corners where the front panels meet the back and continue all the way down the front left panel making 3 dc in each chain 3 loop with a ch 1 between each until you reach the bottom corner of the front left panel.
6. Place 2 dc in the corner loop at the bottom of the front left panel, ch 2, and turn.
7. Return back up the front left panel toward the neckline placing a dc in each dc as well as in each ch1 space.
8. Make a final pass around the neckline and continue down the side of the right front panel making a dc in each dc as well as in each ch 1 space. Ch 1 and turn.
9. Make a final sc pass along both sides and neckline adding a looped chain buttonhole at the corner point of the granny triangle on the front right panel. Fasten off.
10. Attach button to front left panel.
